
revlis.nl
Blog & Notes about OSS, OSes, devops, virtualization, programming (hobby) projects, security and tech news
September 24, 2025 — 18:42
Author: silver Category: virtualization Comments: Off
Work in progress (dec-2024)
Last update: January 2026
Product list
List of virtualization platforms to completely or partially replace VMware Sphere (aimed at “any” enterprise environment besides “small”)
| Vendor / Product | HV | Notes |
|---|---|---|
| “The big boys” | ||
| IBM RedHat OpenShift / OKD | kvm | ➡ Kubernetes distro ➡ has VM addon “OCPv” ➡ OCPv is based on KubeVirt operator |
| OpenStack | multiple | ➡ complex to setup and maintain |
| XCP-ng | xen | ➡ XenServer fork (Vates offers Support) ✔ management appliance available (“XO”) ✖ product seems “unfinished” at best |
| Oracle Virtualization | kvm | ➡ “VM Server” and “Linux KVM” ➡ “Linux KVM” is based on oVirt |
| Nutanix Cloud Platform | ahv | |
| Apache CloudStack | multiple | ➡ OSS ✖ needs specific hardware |
| Azure Local | hyperv | ➡ run vm’s and select azure services on-prem ➡ formerly “azure stack hci” |
| “Second tier“ | ||
| SUSE Harvester HCI | kvm | ➡ built on Kubenetes and KubeVirt ➡ formerly “SUSE Virtualization” ➡ integrates with Rancher ✖ complicated licensing |
| Proxmox Virtual Environment | kvm | ➡ uses debian, linux, novnc etc ✖ seems to be aimed at smaller env’s ✖ outdated management webui |
| OpenNebula | kvm | ➡ touted as vcloud replacement ✔ nice webui, user/tenant self service |
| Virtuozzo Hybrid Infrastructure | multiple | ➡ based on openstack |
| “New and lesser-known players“ | ||
| Sangfor HCI | xen | ➡ chinese company |
| VergeOS | kvm | |
| Scale Computing | kvm | |
| Triton | kvm | ➡ originally developed by Joyent ➡ solaris/illumos based |
| Platform 9 | kvm | |
| HPE VM Essentials | kvm | |
Not included: public cloud
Shortlist
Currently it seems migrating to RedHat’s OCP (and OCPv) is a popular option.
In general, a Kubernetes distro with KubeVirt is a solid choice. The KubeVirt project was initiated in 2016 by RedHat to run KVM vm’s as native k8s objects. Besides OCP there are multiple other products available such as Harvester or “vanilla” k8s.
It benefits from the large k8s landscape (storage, networking etc). Also, combining k8s with kubevirt makes it possible to run both containers and vm’s in a cluster (on bare metal) with somewhat similar functionality as VMware Tanzu.
Ecosystem
Besides VMware’s ESX Hypervisor & vSphere there’s alternatives for vSAN, vCenter, PowerCLI and Aria (Automation, Operations, Logs/vRLI) below.
Storage
Options to replace vSAN or switch to NAS/SAN:
- SDS: CEPH (Rook), OpenShift Data Foundation, Cloudian, Starwind VSAN or zVault (NAS)
- Hardware: DDN/Trintri (NAS), NetApp (NAS), TrueNAS, Pure Storage, HPE, IBM or Dell
Management
vCenter-like products
- Red Hat Hybrid Cloud Console can deploy and manage OpenShift clusters
- Azure Local works like Azure Cloud (Arc control plane)
- Xen Orchestra can manage multiple XCP-NG hosts
- SUSE Rancher can manage Kubernetes and Harvester:
- Red Hat ManageIQ: OpenStack and OpenShift/Kubernetes platforms
IaC
- HashiCorp Terraform / OSS OpenTofu support most vendors
- Red Hat Ansible supports most vendors
- Pulumi if you want use a programming language like Python
Note that Salt(Stack) was acquired by VMware/Broadcom
CLI & scripting
- Azure Local: PowerShell
- XCP-ng: xe cli tool (local)
- Kubernetes: kubectl cli tool
- OpenShift: oc cli tool, Ansible
- ProxmoxVE: bash, Helper-Scripts
Backup
- Veeam
- Hyper-V
- Proxmox VE
- Kasten supports Kubernetes
- Commvault
- Proxmox VE
- Kubernetes (since Jan 2026)
Logging
Centralized logging (“DIY”):
- Elastic (ELK stack)
- InfluxDB (TICK stack)
- Grafana Loki
- Splunk
- GrayLog
API
- Proxmox VE API (REST). Clients: most popular languages
- OpenNebula API (XML-RPC), Clients: Java, Go …
- Nutanix REST APIs and SDK (Python, Java, Go, JS)
- XCP-ng: “XAPI” or Orchestra API
- CloudStack API
- Azure Local API (REST)
- Kubernetes API (OCP, Harvester, KubeVirt)
More information
Links
- https://www.theregister.com/Tag/VMWare
- https://www.reddit.com/search/?q=vmware+alternative
- https://veducate.co.uk/kubevirt-for-vsphere-admins-deep-dive-guide/
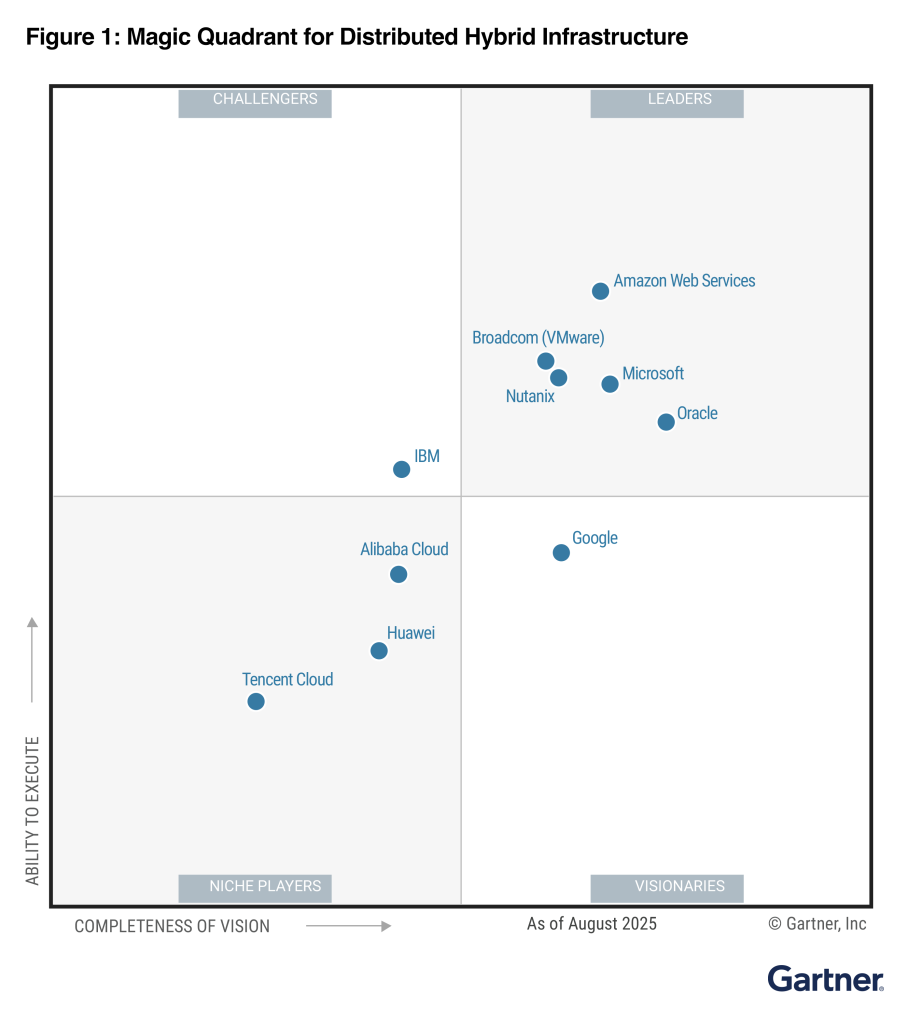
Gartner’s Magic Quadrant
From research reports, to get an idea about market trends
Hyperconverged Infrastructure Software
File and Object Storage Platforms

September 2, 2022 — 19:48
vSAN or "Virtual SAN" is a SDS or hyper-converged infrastructure solution from VMware. It’s an alternative for FC or iSCSI based shared storage. It uses a distributed file system called vDFS on top of object storage. Management is done with vCenter. For details there’s the VMware docs and of course there are already many blogs written over the years. What follows below are a few things to take into consideration from an architecture and operations PoV.
Use case
Small to mid sized environments (single to low double digit hosts) with a shared storage requirement and no available storage expertise, where you want to make full use of the ESXi hosts hardware.
Design considerations
vSAN is not just "storage" but a clustered solution which fully integrates with vSphere.
While COTS hardware can be used, all devices have to certificated for and compatible with vSAN per VMware’s requirements. Storage will usually be (a combination of) SSD and flash based devices and optionally a Cache device.
Network-wise there are no special requirements, besides the usual storage related considerations about latency and bandwidth. Since version v7U2 it is possible to use vSAN over RDMA ("vSANoRDMA") instead of TCP, offering lower latency and higher performance. Besides compatible NICs, RDMA (RoCE v2) requires a network configured for lossless traffic — which most recent network devices should support.
You will need a minimum of 3 hosts. The default setup is a Single site cluster. A stretched cluster configuration is also possible, with 2 sites replicating each others data. As it’s a cluster consider failure domains, split brain/node isolation scenario’s, quorum, witness and FTT (Faults to Tolerate).
Data can be encrypted both in transit and at rest.
Caveats
After enabling vSAN it will take care of HA instead of vSphere HA. This means heartbeats will go over the vSAN Network instead of the usual Management Network.
Although VMware tells you vSAN will work fine without vCenter (which is technically true), you should be prepared to fix issues while VC is unreachable. As there are catch 22 situations where VC has no storage since vsan is unavailable, but you want to use VC to fix it. Which could mean you have to (temporary) setup a new vCenter or use the cli.
While it’s possible to directly store files on a vSAN backed datastore, you should instead setup "File services" which offers SMB and NFS shares. It does this by placing a VM on each node.
Note that with RDMA, LACP or IP hash based NIC teaming are not supported.
While "selective" data replication using SPBM is possible, this can quickly get complicated (e.g. having to micro manage storage per VM).
Since v7U2 data at rest encryption can be setup without an external KMS, by using vSphere as Native Key Provider (NKP). Besides having an sane key management policy, this requires UEFI Secure Boot and TPM 2.0 to be enabled on the hosts first.
Before you can Enter Maintenance Mode on a host, as an extra step vSAN might need to migrate data to remaining hosts in the cluster.
Data integrity has been excellent for me, but accessibility? Maybe not so much. I did tests with lost network connectivity, removed hosts from the cluster and other methods of breaking the cluster by changing vsan configuration and removing/redeploying vCenter. I was always able to get full access back to the vsan datastore without any data corruption. However, this took considerable amounts of time using esx cli rebuilding the cluster meaning downtime because VM’s had no storage.
December 16, 2019 — 15:33
Author: silver Category: virtualization Comments: Off
Tired of typing that root (or admin) password into console? Thanks to the always excellent virtuallyghetto.com there’s an easier method now. It works with all kinds of text by sending usb scan codes.
It uses an object VMware.Vim.UsbScanCodeSpecKeyEvent which is used with $vm.PutUsbScanCodes()
However, ready to use PS and GO code is already provided.
Using PowerShell this can be combined with Get-Credential for example.
December 3, 2017 — 18:38
Author: silver Category: virtualization Comments: Off
It’s possible to upgrade an Virtuozzo/OpenVZ CT/VPS from Debian 7 wheezy to Debian 8 jessie.
The only caveat is you might have issues with systemd depending on the hardware node (kernel version).
If you replace systemd with sysvinit you make sure the container will boot after upgrading.
1)
cat << EOF > /etc/apt/preferences.d/local-pin-init
Package: systemd-sysv
Pin: release o=Debian
Pin-Priority: -1
EOF
2)
sed -i 's/wheezy/jessie/g' /etc/apt/sources.list
Also check /etc/apt/sources.list.d/*
apt-get update
3)
Install sysvinit:
apt-get install sysvinit-core sysvinit-utils
You can also do this after the upgrade, but make sure you do it before rebooting
This error can be ignored, it will work on reboot:
sysvinit: restarting...init: timeout opening/writing control channel /run/initctl
.init: timeout opening/writing control channel /run/initctl
4)
apt-get upgrade

apt-get dist-upgrade
There will be messages about new versions of configuration files (e.g. /etc/ssh/sshd_config)
reboot
November 27, 2016 — 2:51
Author: silver Category: virtualization Comments: Off
Tips & tricks
Guest clipboard:
/usr/bin/VBoxClient
/usr/bin/VBoxClient --clipboard
/usr/bin/VBoxClient --draganddrop
Resize VDI:
- SIZE_IN_MB would be 30000 for 30GB
- VBoxManage list hdds
Windows Host:
C:\Program Files\Oracle\VirtualBox\VboxManage.exe modifyhd YOUR_HARD_DISK.vdi --resize SIZE_IN_MB
Mac Host:
# /Applications/VirtualBox.app/Contents/MacOS/VBoxManage modifyhd YOUR_HARD_DISK.vdi --resize SIZE_IN_MB
Linux Host:
# VBoxManage modifyhd YOUR_HARD_DISK.vdi --resize SIZE_IN_MB
Linux Guest: # resize2fs /dev/sda1
Compact disk
Windows Guest:
– Cleanup
– Defrag
– sdelete -z, sdelete -c
– shutdown
– VboxManage modifyhd –compact disk.vdi
Convert disk:
/usr/bin/VBoxClient --displayVBoxManage internalcommands converttoraw file.vdi file.raw
VBoxManage clonehd hdd.vdi hdd.img --format raw
convertfromraw

  [--format VDI|VMDK|VHD]

   [--variant Standard,Fixed,Split2G,Stream,ESX]

   [--uuid ]
convertfromraw stdin

   [--format VDI|VMDK|VHD]

   [--variant Standard,Fixed,Split2G,Stream,ESX]

   [--uuid ]
clonehd <uuid|inputfile> <uuid|outputfile>

   [--format VDI|VMDK|VHD|RAW|]

   [--variant Standard,Fixed,Split2G,Stream,ESX]

   [--existing]
Autostop – Linux Host:
VBoxManage modifyvm VM [--autostop-type disabled|savestate|poweroff|acpishutdown]
VBoxManage modifyvm VM --autostop-type acpishutdown
Autostart init script:
From: https://forums.virtualbox.org/viewtopic.php?f=7&t=65194
Re: Autostart VM on debian 7.7 virtualbox 4.3.20
Post by lnunes_pt » 19. Dec 2014, 02:40
Hi PavloM,The answer to the first question is, NO, you need not login to host. But also, NO, you need not reboot host to test VMs starts.
The manual section 9.23.1 is not complete. Don’t use vbox.cfg for the configuration file name, otherwise setproperty autostartdbpath will lead to command syntax issues later.Just to be sure you know, the VirtualBox autostart service init script is specially used in cases where you have many users on the host and want to control who can autostart VMs upon boot.
If you’re the only user on the host its alo just simpler start any headless VM from /etc/rc.local.
Edit /etc/default/virtualbox
    VBOXAUTOSTART_DB=/etc/vbox
    VBOXAUTOSTART_CONFIG=/etc/vbox/vboxautostart.cfg
Edit vboxautostart.cfg using Bob example how to deny all and allow bob:
    default_policy = deny
    bob = {
        allow = true
        startup_delay = 10
    }
Create the vboxautostart.cfg file. Add vboxusers group to /etc/vbox and sticky bit.
    # chgrp vboxusers /etc/vbox
    # chmod 1775 /etc/vbox
Add vboxusers group to all users (of course).
Then Execute once as users:
$ VBoxManage setproperty autostartdbpath /etc/vbox
And for every VM to start, then you find under /etc/vbox, user.start file.
But also how it will stop, then you find under /etc/vbox, user.stop file.
    $ VBoxManage modifyvm  --autostart-enabled on
    $ VBoxManage modifyvm  --autostop-type acpishutdown
Then test START and STOP as root without need of host reboot.
# /etc/init.d/vboxautostart-service start
Logon to the VM and test the shutdown next. You should get logged off for system shutdown:
# /etc/init.d/vboxautostart-service stop
Note The Virtualbox autostart script should exist /etc/init.d/vboxautostart-service (it can be downloaded from Source Code Repository: trunk -> src -> VBox -> Installer -> linux -> vboxautostart-service.sh)
Autostart delay:
VBoxManage modifyvm VMNAME --autostart-delay 10
Autostop – Windows Host:
- VmServiceTray: https://sourceforge.net/projects/vboxvmservice/
- Batch: https://git.io/v5qUP (run using Task Scheduler or gpedit > “Scripts Shutdown/Logoff” etc, untested)
- Python script: https://blog.ionelmc.ro/2014/01/04/virtualbox-vm-auto-shutdown/ (untested)
Display
VBoxManage controlvm VMNAME setvideomodehint 1680 975 16
(or 16/24/32)
Headless
VBoxManage startvm "VM" --type headless
Shares
Host: Share Folder (e.g. “foo”), Full Access (write)
Guest: # mkdir /mnt/foo; mount -t vboxsf ~/foo /mnt/foo
Mount VDI (NTFS)
Guest:
# modprobe nbd max_part=16
# qemu-nbd -c /dev/nbd0 image.vdi
# mkdir /mnt/image; mount /dev/nbd0p2 /mnt/image
To remove:
# qemu-nbd -d /dev/nbd0
July 25, 2014 — 8:53
Author: silver Category: virtualization Comments: Off
Update 2022
Of course most of this is outdated by now and instead of Perl we now have PowerCLI (and govc) and open-vm-tools has replaced vmware-tools :)
VM – sysctl
Memory related optimalisation:
vm.swappiness = 10

vm.dirty_ratio = 60

vm.dirty_background_ratio = 2

vm.overcommit_ratio = 0

vm.overcommit_memory = 0

kernel.shmmax = 268435456

kernel.shmall = 268435456

vm.min_free_kbytes = 65536
Reboot a minute after a kernel panic:
kernel.panic = 60

kernel.panic_on_oops = 60
Disable IPv6:
net.ipv6.conf.all.disable_ipv6 = 1

net.ipv6.conf.default.disable_ipv6 = 1
VM – install vmware-tools
Debian:
RedHat:
VM – rescan/resize disk without reboot
echo "- - -" > /sys/class/scsi_host/host#/scan

/usr/share/doc/sg3-utils/examples/archive/rescan-scsi-bus.sh

/sys/class/scsi_disk

ls

cd 0:0:0:0

echo '1' > device/rescan

xfs_growfs /dev/sdb
Settings vmx
bios.bootDelay = "5000"

suspend.disabled = "TRUE"
Using vim-cmd
http://blogs.balius.com/2010/12/24/esxi-creating-new-virtual-machines-servers-from-the-command-line/
vim-cmd vmsvc/getallvms

vim-cmd vmsvc/device.diskremove 272 0 1 n

vim-cmd solo/registervm /vmfs/volumes/vm01/vm01.vmx vm01

vnum=$(vim-cmd solo/registervm /vmfs/volumes/datastore1/$1/$1.vmx)

vim-cmd vmsvc/power.on $vnum

vim-cmd vmsvc/power.off $(vim-cmd vmsvc/getallvms |grep $1|awk '{print $1}')

vim-cmd vmsvc/destroy $(vim-cmd vmsvc/getallvms |grep $1|awk '{print $1}')
vSphere SDK for Perl
Installation:
Download VMware vSphere Perl SDK
Linux: installer uses CPAN
Windows: ActivePerl is not included in 6.5 anymore so it needs to be installed first (Strawberry Perl is also supposed to work), installer uses PPM for packages
Options for authentication (besides user/password):
- Config file:
--config - Environment Variables:
VI_USERNAME VI_PASSWORD - Credential store:
VICredStore.pm - Session file:
--sessionfile - Windows SSPI:
--passthroughauth
http://pubs.vmware.com/vsphere-65/topic/com.vmware.perlsdk.pg.doc/viperl_proggd_preface.2.1.html
http://pubs.vmware.com/vsphere-65/topic/com.vmware.ICbase/PDF/vsphere-perl-sdk-65-programming-guide.pdf
Hardening script:
Original script: vmwarevSphereSecurityHardeningReportCheck.pl
vSphere 6.x update: vmwarevSphereSecurityHardeningReportCheck.pl
http://communities.vmware.com/docs/DOC-9852
http://www.vmware.com/security/hardening-guides.html
January 20, 2014 — 0:44
Virtuozzo virtualization (VZ):
- Virtuozzo Containers
- Virutozzo Storage (formerly PCS or Parallels Cloud Server/Storage).
- https://virtuozzo.com
- http://kb.virtuozzo.com
- formerly by Odin, Parallels and SWSoft before that
- OpenVZ is the free open source software basis.
Commands:
Create Container:
vzctl set 104 --save --ipadd 10.0.0.104/24 --hostname node104 --nameserver 8.8.8.8 --userpasswd root:node104
vzctl create 99 --ostemplate centos-6-x86_64
vzctl set 99 --save --hostname bla.eu --ipadd 1.2.3.4/24 --nameserver 8.8.8.8
Optional parameters: --diskspace 10000000 # 10GB diskspace --ram 1024M --swap 512M
UBC: physpages swappages 262144×8 = 8GB
prlctl create 101 --vmtype ct
Create VM:
ls /etc/vz/conf/dists
prlctl create MyVM --distribution win-2008 --vmtype vm
List containers:
vzlist -o ctid,hostname,ip,gw,offline_management,status,ostemplate,uptime
vzps -eo ctid,user,vpid,pid,pcpu,pmem,vsz,tty,stat,start_time,bsdtime,args
Packages:
Install/remove package in container:
vzpkg install -p 101 yum
vzpkg remove -p 101 postgresql -w
Update package cache:
vzpkg update cache centos-6-x86_64
Backup:
List on server:
# vzarestore -l -f
# vzarestore --browse xxxx-0000-0000-0000-xxxx/20140708031442 -d /dir
List vzabackups with oneliner:
Client:
# vzarestore 1207 --files /dir/file -b xxxx-0000-0000-0000-xxxx/20140708031442 --skip-ve-config --storage [email protected]
Exec:
exec ls on all ct’s on hwnode
for i in $( vzlist -Hoveid ); do vzctl exec $i ls; done
Clone container:
vzmlocal -C 101:111
Migrate container:
pmigrate c localhost/<CTID> c host2/<CTID> --online -v
Stats:
cat /proc/vz/hwid
vzstat
PCS:
Move CT:
Important! For the command to be successful, a direct SSH connection (on port 22) should be allowed between the source and destination servers.
Make sure network connection can be established from destination to the source TCP port 1622.
# prlctl migrate
VNC:
echo <vnc_password> | nohup prl_vncserver_app --auto-port --min-port 5800 --max-port 65535 --passwd <VM_UUID> &
prlctl set name --vnc-mode auto --vnc-passwd pass123
vncviewer localhost:5800 -geometry=1280x960
Parallels Tools
prlctl installtools <VM_NAME>
Windows VM:
prlctl set --device-set cdrom0 --connect --enable --image /usr/share/parallels-server/tools/prl-tools-win.iso
Network:
vzctl set 1788 –save –netif_add eth0
vzctl set 1788 –save –ifname eth0 –network NW-NAME –gateway 10.0.0.1 –ipadd 10.0.0.10/255.255.255.0 –dhcp6 yes
prlctl set 1788 –device-add net –network NW-NAME –ipadd 10.0.0.10/255.255.255.0 –ipadd 10.0.0.11/255.255.255.0 –dhcp6 yes –gw 10.0.0.1
VZ Windows:
Fix pva agent:
echo exit > exit.cmd
for /f %i in ('vzlist -Ho veid') do vzctl enter %i < exit.cmd
bind mounts (nfs, cifs):
vzctl set 1113 --bindmount_add /vz/www:/var/www/vhosts/1,nosuid,noexec,nodev /mnt/dir1:/mnt/dir2,nosuid,noexec,nodev --save
mount -n -t simfs /vz/www /vz/root/1502/var/www/vhosts/2 -o /vz/www
You must be logged in to post a comment.